

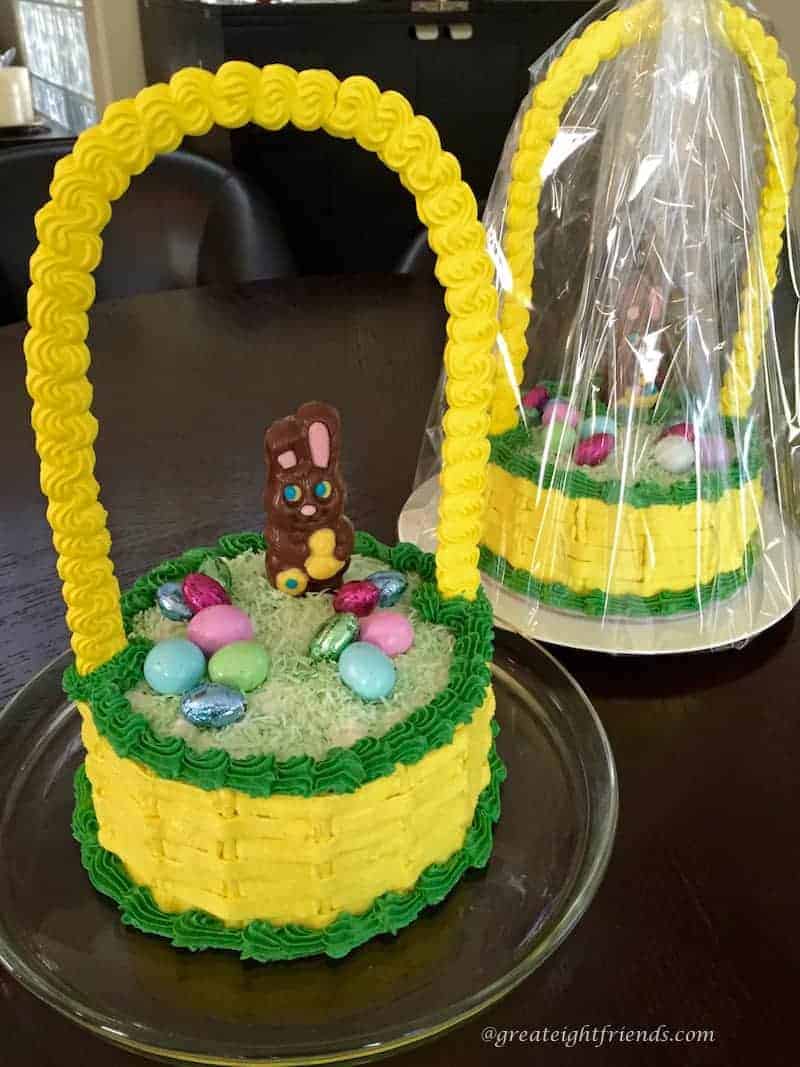
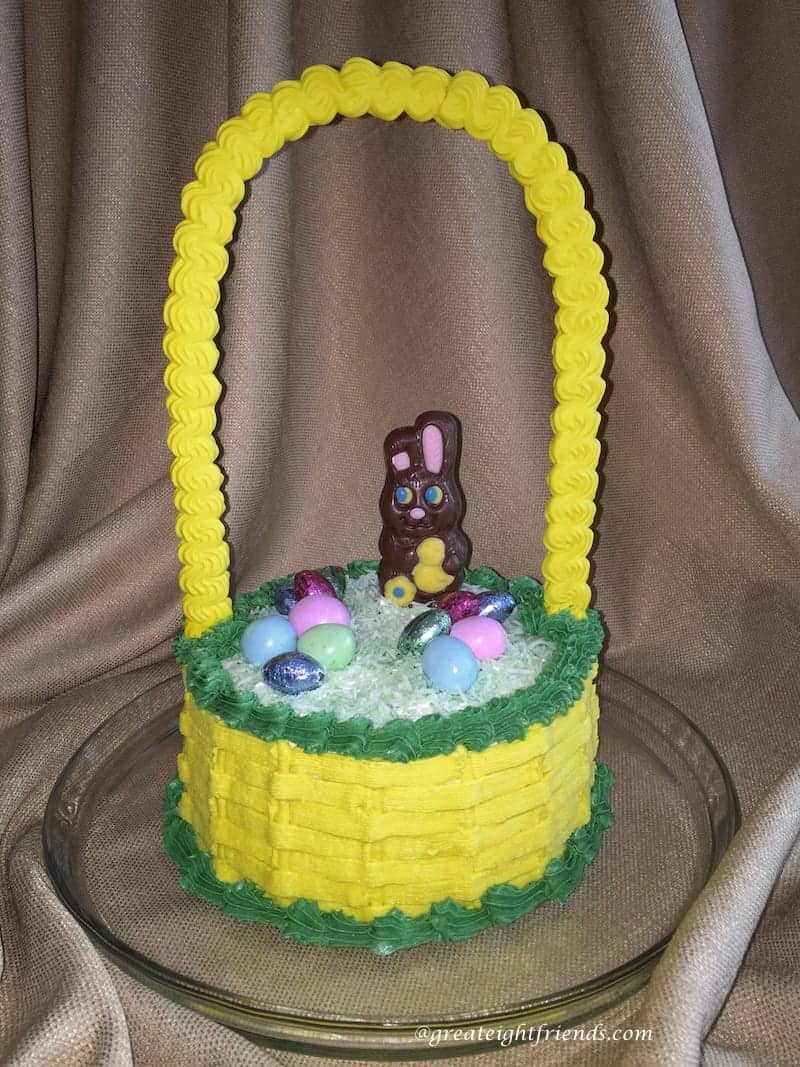
It's a cake, it's an Easter basket... it's BOTH!
Kids love to eat all the goodies in their Easter baskets...how about letting them eat the basket, too! I promise if you show up at Easter brunch with this Easter Basket Cake, it will be a hit!
Start well ahead of time to make the stunning handle. If you want a more stable dessert, make the handle shorter. I use the cellophane wrap to stabilize the height of the handle.
If you are hosting Easter brunch, click here for some Gr8 ideas!

Easter Basket Cake
This Easter Basket Cake makes a beautiful dessert, a delightful gift and a stunning Easter decoration!
Servings: 12 servings
Ingredients
Equipment Needed
For the Handle:
- Wire Cutter
- Brass Wire about 26 gauge
- Parchment Paper
- Tape
- Royal Icing, I use Wilton Meringue Powder* to make mine
- Gel Icing Color - Yellow
- Icing Bag, or sandwich bag
- Star Decorating Tip
- Bag Coupler - see below
For the Cake:
- 2 8- or 9-inch round layers, your choice
- 1 Royal Icing Handle - see directions
- 2 batches Decorator Icing
- Gel Icing Color - Yellow and Green
- ½ cup Flaked Coconut
- Liquid Green Food Coloring
- 2 Icing Bag
- 2 Bag Couplers
- 1 Round Decorating Tip - #10, #11, or #12 - see below
- 1 Star Decorating Tip - see below
- 1 Basket Weave Decorating Tip - see below
- Toothpicks
- 2 plastic drinking straws
- Easter candy of your choice - chocolate bunny, Peeps®, jelly beans, chocolate eggs, etc.
Instructions
- You need to start at least 4 days ahead of time.
Step One:
- Bake the cake layers first.
- Make any kind of cake you like, chocolate, yellow...how about a funfetti cake?! This is so you get the measurement for the handle just right. As soon as you have finished measuring, wrap the layers in plastic wrap, put them in a plastic bag and store in the freezer for the next couple of days.
Step Two:
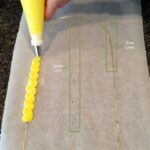
- Measure for the handle.
- Decide how tall you want the handle. I love the drama of a tall handle, so I make mine between 15" and 18" tall. (You can definitely make it shorter if you prefer.)
- Tear off a piece of parchment paper that is about 8" longer than the desired handle height. Once the cake layers are cooled measure the diameter of the layers. You will make the width of the handle 1" less than the diameter of the cake.
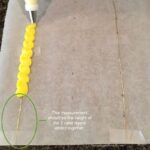
- Using a ruler, mark the center of the parchment paper. Then make parallel markings to each side of the center line the width of the handle. For instance, if the cake layers are exactly 8" in diameter, you will want the handle to be 7" wide. So after marking the center line, measure 3 ½" to each side and make those marks the length of the paper. This will be the line your wire follows.

- Then measure the HEIGHT of each layer and add those together. If each layer is 2" high, then you want to add 4 inches to each side of the handle to stick into the cake.
- For a 16" high handle, you will want about 40" of wire. Since wire comes on a roll, you will have to do some straightening and manipulating of the wire to get it to cooperate.
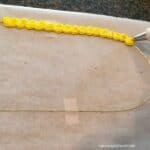
- Tape the wire to the parchment paper...not much sticks to parchment paper, so it may take some doing. This is just to stabilize the wire while you are piping the icing.
- Make the Royal Icing and tint it using the Yellow Gel Icing Color.
- Prepare an Icing Bag with a coupler and the Star Decorating Tip.
- Fill the bag with the yellow royal icing and pipe "S" shapes onto the wire, making sure they touch one another.
- Let the handle sit at room temperature until fully dry. This will take at least 24 hours. Make sure it is completely dry before turning over or it may crack.
- When totally dry, CAREFULLY lift the handle up and turn it over, at this point you can remove the tape. (The handle at this stage is very fragile.) It's okay if you can't remove all of the tape, it will be covered by the icing.
- Then pipe icing onto the back side of the handle.
- Let this dry for 48 hours. There will be no more shine once fully dry.


Step Three:
- Decorate the cake.
- You can decorate the cake while still frozen if doing it the day before.
- Make 2 batches of Decorator Icing. Keep the bowl covered with a wet towel while using so the icing doesn't dry out.
- Ice the bottom layer, then lay the 2nd layer on top. Frost the sides of the cake with a thin layer of icing, then put a thicker layer of frosting on top.
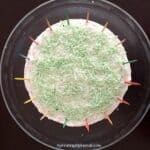
- Place the coconut into a plastic bag, drop in a few drops of liquid green food coloring. Seal and shake the bag. Continue adding more green food coloring and shaking the bag until you achieve the color you like.
- Sprinkle the coconut over the top of the cake leaving about ½-inch around the edges.
- Then place toothpicks at regular intervals around the top of the cake as a guide for the basket weave.
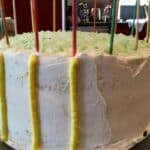
- Put ⅔ of the icing into another bowl and, using the Yellow Gel Icing Color, mix the frosting to the yellow desired.
- Prepare a plastic icing bag with a coupler and the Round Tip. Using the toothpicks as guides, pipe vertical lines down the side of the cake, one line for each toothpick.
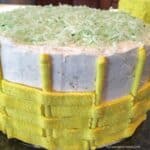
- Switch the tip over to the Basket Weave Tip and pipe your basket weave.
- Once the basket weave is complete tint the remaining ⅓ of the white decorator icing using the Green Gel Icing Color. Put it into an icing bag with the Star Decorating Tip and pipe a border around the bottom of the cake and around the top.
- Cut two pieces of plastic drinking straw to the height of the cake. Stick them down into the cake, about ¼ " from the edge, directly across from each other. (You will be going through the star border, but don't worry about it.) The handle will stick into these straws. If you need additional stabilization, I often will pipe some royal icing where the icing part of the handle meets the cake. This is why it is important to measure correctly. The naked wire part of the handle must go all the way into the cake. Add some of the green icing around the bottom of the handle.
- Let the icing dry for at least a couple hours.
- Using clear cellophane, wrap the "basket" as you would wrap any Easter Basket and complete it with a pretty bow. This is IMPORTANT! If you plan on transporting the cake, you MUST wrap it to help with stabilizing the handle.
Tried this recipe?Mention @Great8Friends or tag #gr8food!
*Gr8 Shopping:
If you live near a cooking store or craft store, you should be able to get all of the supplies there.
Be a Gr8 Friend and tell us what you think!