• Skip to primary navigation
  • Skip to main content
  • Skip to primary sidebar
Great Eight Friends
  • Gr8 Food ∞
    • Appetizers
      • Dips and Spreads
    • Beverages
      • Adult Beverages
      • Non-Alcoholic Drinks
    • Bread
      • Quick Bread
      • Yeast Bread
    • Breakfast and Brunch
      • Egg Dishes
    • Desserts and Snacks
      • Cakes and Cupcakes
      • Candy and Confections
      • Cookies
      • Fruit
      • Pies and Tarts
      • Snacks
    • Instant Pot Recipes
    • 130+ Main Courses
      • Beef
      • Fish
      • Lamb
      • Meatless
      • Pork
      • Poultry
    • Salads and Dressings
    • Sauces Salsas Marinades
    • Side Dishes
      • Pasta
      • Potatoes
      • Rice and Grains
      • Vegetables
    • Soup
  • Gr8 Friends ∞
    • Gr8 Dinners
    • Gr8 Holiday Ideas
    • Other Occasion Parties
  • Gr8 Fun ∞
    • Debbie's Craft Corner
    • Gr8 Trips
      • Field Trips
      • Vacations
    • Other Gr8 Stuff
      • Our Favorite Kitchen Tools
    • Restaurant Reviews
  • Who We Are
    • GR8 Party Outlines
    • Become a Gr8 Friend!
menu icon
go to homepage
search icon
Homepage link
  • Become a Gr8 Friend!
  • Main Courses
  • Appetizers
  • Beverages
  • Bread
  • Breakfast and Brunch
  • Desserts and Snacks
  • Instant Pot Recipes
  • Salads and Dressings
  • Sauces Salsas Marinades
  • Side Dishes
  • Soup
  • Gr8 Friends
  • Gr8 Dinners
  • Gr8 Fun
    • Email
    • Facebook
    • Instagram
    • Pinterest
  • ×

    Recipe for Candied Pineapple Slices

    August 17, 2016 by Anna Leave a Comment

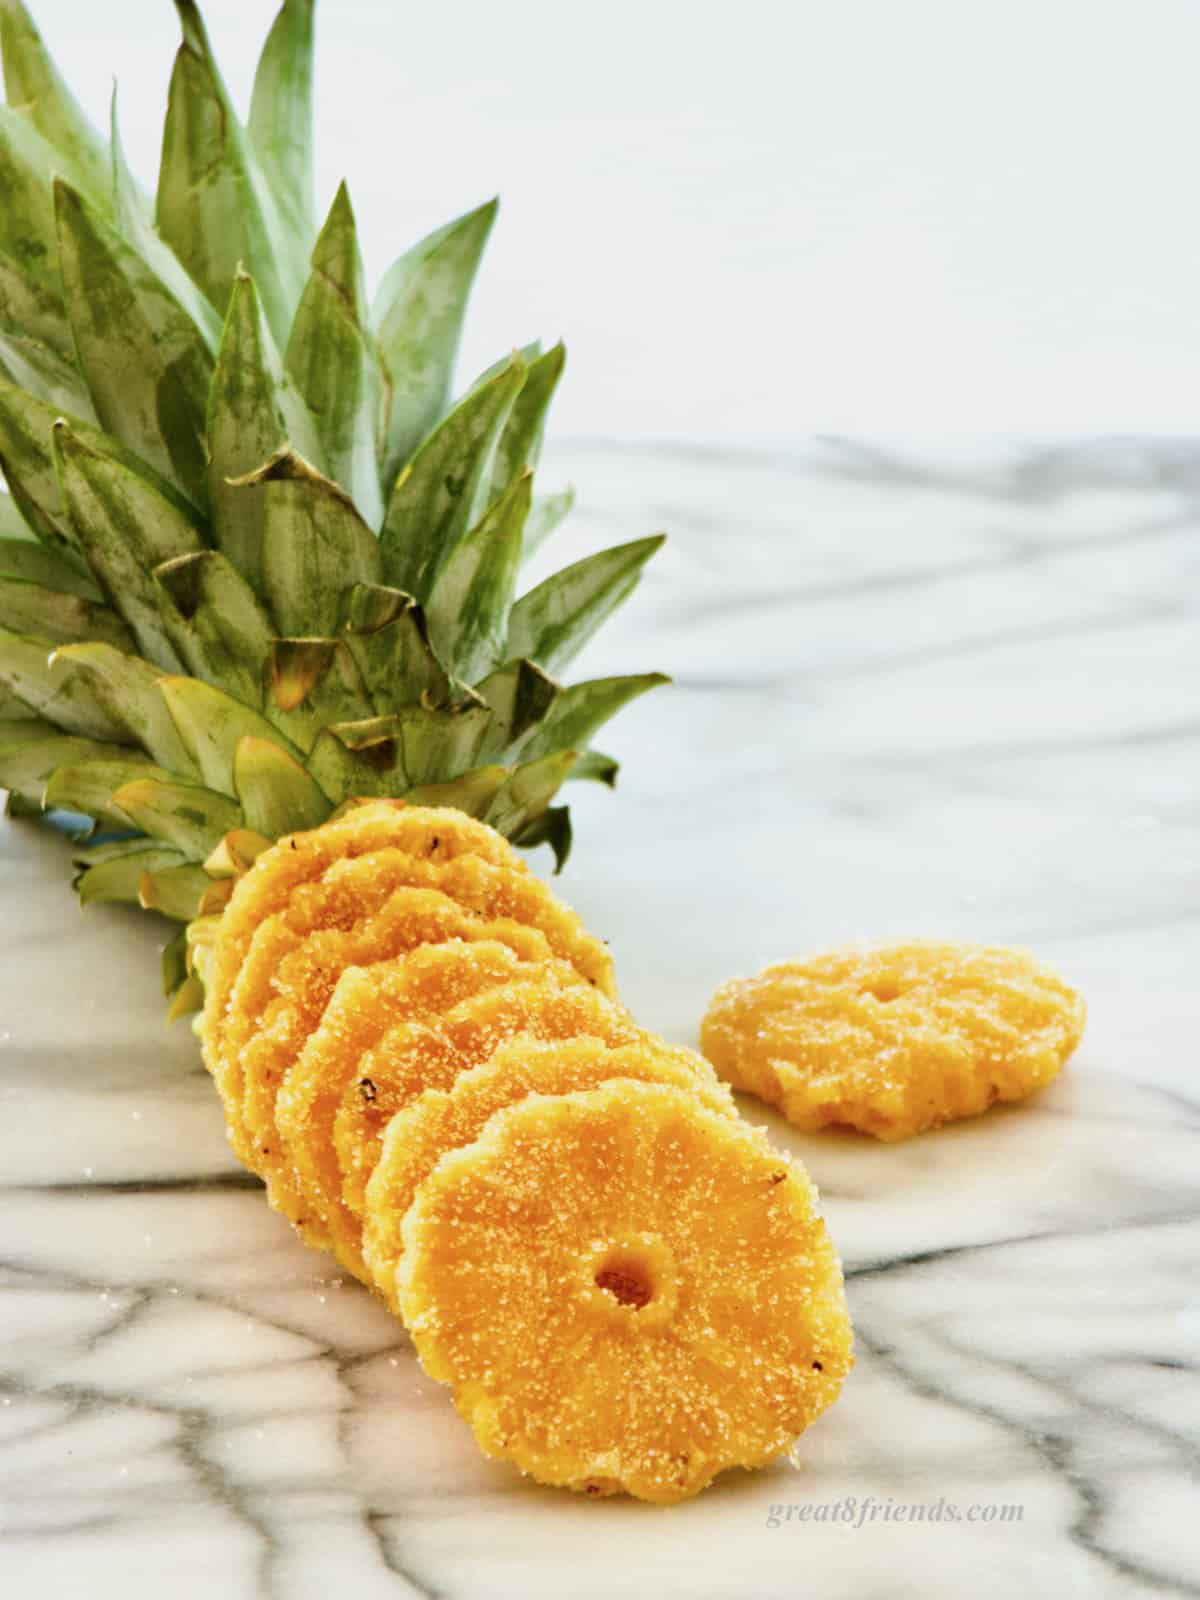
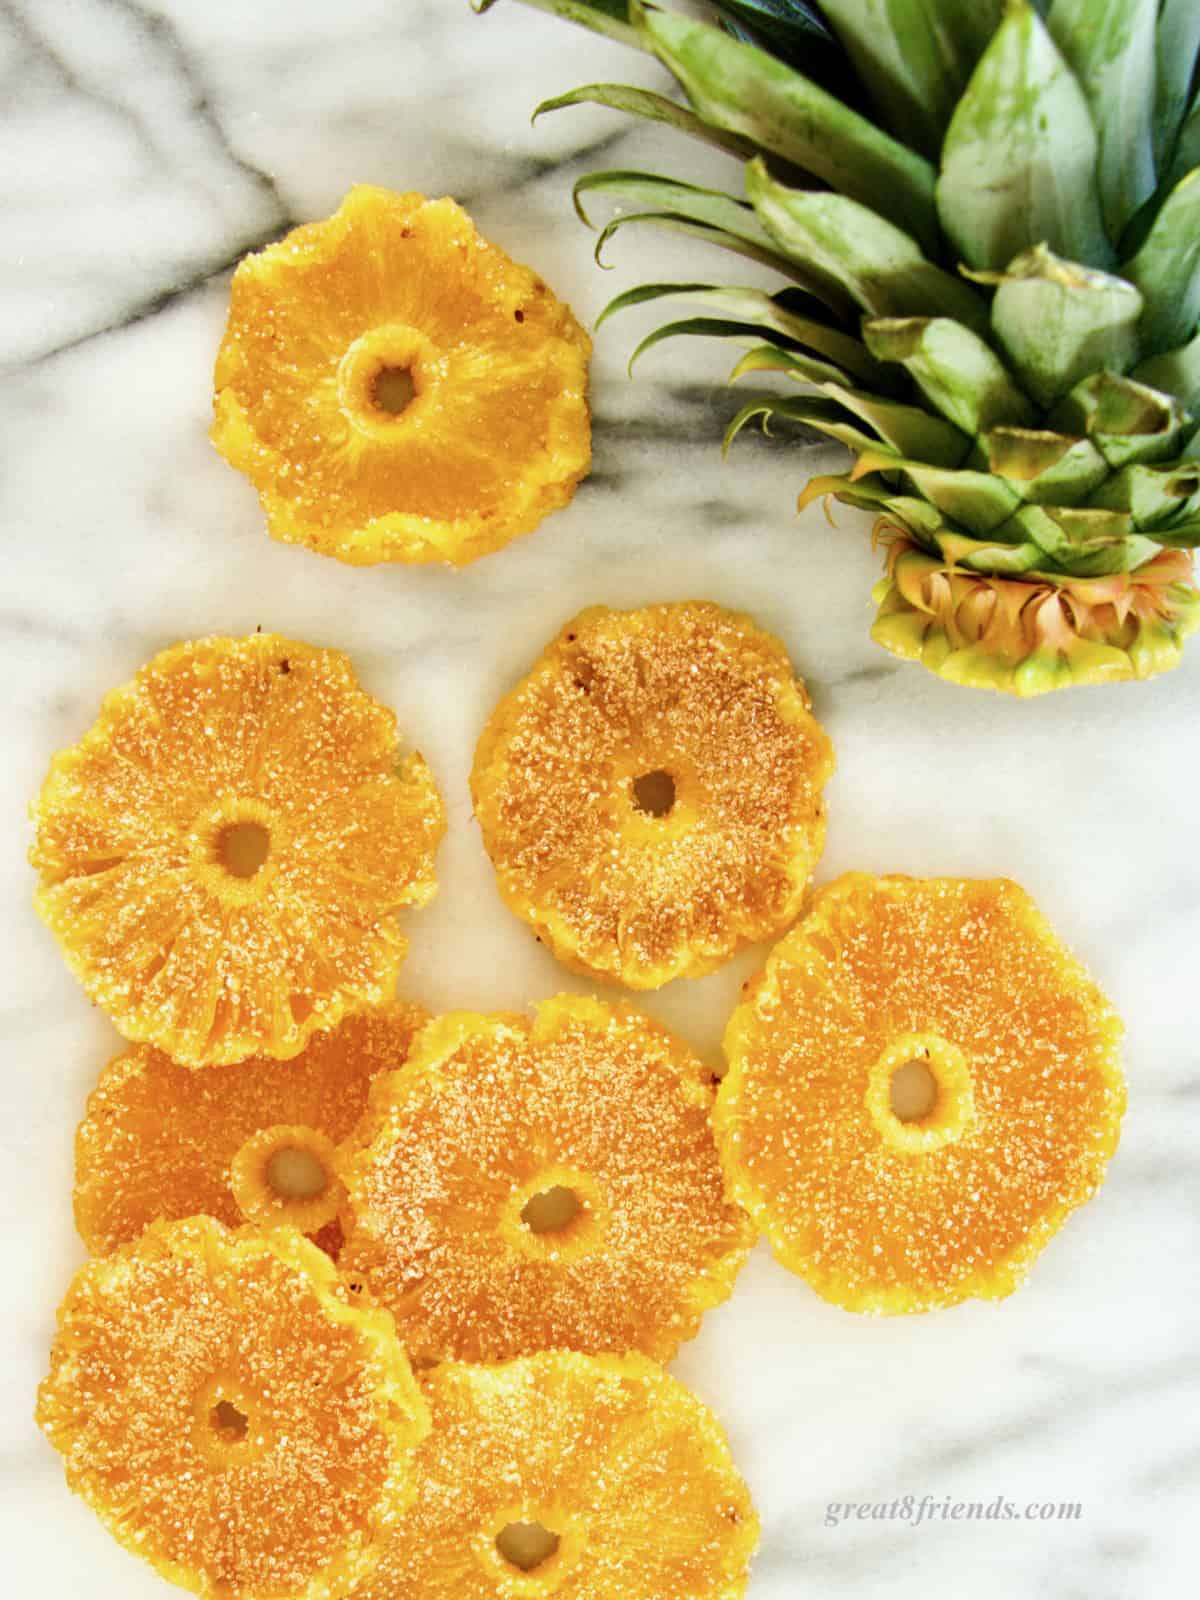
    Candied Pineapple Slices are Gr8 on served on ice cream, as a gift, or as a garnish for cake. And they are delicious to eat as a snack!

    Here is a Gr8 idea for a gift or garnishing a cake or serving alongside ice cream for dessert. Or how about dipping some in chocolate? YUM!

    This recipe for Candied Pineapple Slices is is versatile AND...BONUS...EVERYONE will love these!

    I decided to make Candied Pineapple to put on top of the Pineapple Rum Cake that was the dessert for Kyle and Joel's Margaritaville Gr8 Dinner.

    Candied pineapple slices lined up with a pineapple top at the back.

    There were leftovers after decorating the cake so each couple got some in a little plastic gift bag just for a snack!

    How to Make Candied Pineapple

    These are not difficult, but if you don't have a dehydrator (I don't), then the oven time could be lengthy. So make sure you are going to be home.

    Peel the Pineapple

    Stand the pineapple up and use a very sharp knife to slice downward between the prickly skin and the fruit. You may not get all the "eyes," but that's okay.

    You can remove the individual "eyes" with a small paring knife.

    Candied pineapple slices laying on marble.

    Make the Slices

    The slices need to be thick enough to hold up during simmering and the dehydrating but not so thick that they take too long to dry out.

    I've found that about three-eighths inch thick works best. Don't make yourself crazy trying to be exact, but use this measurement as a guide.

    Candied pineapple slices laying on marble.

    Infuse the Pineapple

    Make a modified simple syrup (see ratios in recipe card), bring to a boil, then gently add the pineapple slices.

    The fruit needs to simmer for about an hour.

    Once it's been infused with the sugar, remove the rings from the water with a slotted spoon and place them on a wire rack sitting atop a rimmed baking sheet to drain. Make sure they are not overlapping or touching.

    Dehydrate the Slices

    If you have a dehydrator, then follow the instructions for your appliance.

    If not, then, heat your oven to 200ºF. Place the pans with the racks of pineapple into the oven. My slices took 6 hours, but I live in a humid environment. Check your slices after 4 hours. They may take more or less time than mine.

    Candy the Fruit

    When the slices are dehydrated sprinkle generously with granulated sugar or place the sugar in a shallow dish and dip the slices to cover.

    If you want to dip these in chocolate, then skip the dipping in sugar.

    Candied pineapple slices laying on marble.
    Print Recipe Pin Recipe Save this RecipeSaved!

    Please leave a rating!

    5 from 3 votes

    Candied Pineapple Slices

    These Candied Pineapple Slices make a Gr8 gift or are perfect as garnish on my Pineapple Rum Cake.
    Prep Time1 hr 15 mins
    Cook Time6 hrs
    Total Time7 hrs 15 mins
    Course: Dessert, Snack
    Cuisine: American, Tropical
    Keyword: Candied Pineapple, Pineapple
    Servings: 10 slices
    Calories: 200kcal
    Author: Anna

    Ingredients

    • 1 large fresh pineapple
    • 4 cups water
    • 2 cups sugar
    Prevent your screen from going dark

    Instructions

    • Peel the pineapple, remove the eyes, then slice in about ⅜" slices. (You don't have to be super accurate, but you want the slices thicker than ¼" and not quite ½".) As the slices dehydrate, they become thinner.
    • Core the slices. If you can core the pineapple before you slice it, then that's okay. I find it easier to core each slice with my apple corer.
    • Stir together the water and sugar in a large pot (I used my Dutch oven) over high heat. (If it doesn't look like this will cover all the pineapple, then add another ½ cup of sugar and one cup of water.)
    • Bring the sugar water to a rolling boil.
    • When the water is boiling, carefully add the sliced pineapple and bring the syrup back to a simmer.
    • Cover and simmer for 50-60 minutes until the fruit is translucent.
    • While the pineapple is simmering place a wire cooling rack onto a baking sheet. If you are not using a dehydrator, then heat your oven to 200ºF
    • With a slotted spoon remove the pineapple rings from the syrup and place on the prepared cooling rack to drain. Do not overlap the slices.
    • If you have a dehydrator, then follow the directions to dry the rings.
    • Place the pans with the racks of fruit into the oven to dry. In my oven this took 6 hours; but I live in a humid environment, so it may take less time in your oven. Check the fruit occasionally to see if it is done.
    • Sprinkle slices generously with granulated sugar.
    • Now try to keep your family from eating them all up before you serve them!

    Notes

    Gr8 Do-Ahead Tip:

    Store slices separated by waxed paper or parchment paper in a sealed container at room temperature for up to 5 days.

    Gr8 Tip for the Leftover Syrup:

    Don't toss that sweet, pineapple-y syrup you've just made! Use it to brush onto your cake layers or use it instead of simple syrup in a tropical cocktail.
     
    This nutritional information is only an estimate. We do not guarantee the accuracy of the nutritional information for any recipe on this site.

    Nutrition Information

    Calories: 200kcal | Carbohydrates: 52g | Protein: 1g | Fat: 1g | Saturated Fat: 1g | Sodium: 6mg | Potassium: 99mg | Fiber: 1g | Sugar: 49g | Vitamin A: 52IU | Vitamin C: 43mg | Calcium: 15mg | Iron: 1mg
    Tried this recipe?Mention @Great8Friends or tag #gr8food!

    More Fruit Snacks

    • Mini Fruit Pies
    • Strawberry Rosé Ice Pops
    • Tangy Lemon Bars
    • Apples with Toffee Dip
    • Easy Pear Tart
    « Coconut Lime Cilantro Rice - Island Time!
    Lustrous Olive Oil »

    Reader Interactions

    Be a Gr8 Friend and tell us what you think! Cancel reply

    This site uses Akismet to reduce spam. Learn how your comment data is processed.

    Primary Sidebar

    Be a Gr8 Friend!

    Talk With Us!

    • Debbie on Layered Vegetable Pâté Recipe
    • Charles Ayash on Layered Vegetable Pâté Recipe
    • Kyle on Easy No Bake Peanut Butter Kiss Cookies
    • Kyle on Warm Spinach Potato Salad with Bacon Vinaigrette
    • wonderfulcook.com on Warm Spinach Potato Salad with Bacon Vinaigrette
    my foodgawker gallery

    Need More Servings?

    Our recipes will do the calculation for you. Just hover over the number of servings then move the slider to the number desired. (Please be aware: this will not change pan or bowl sizes, so you may have to adjust for that.)

    It's Grilling Season!

    ThermoWorks Thermapen Mk4

    Footer

    About

    • Privacy Policy
    • Disclaimer

    Newsletter

    • Sign Up! for emails and updates

    Contact

    • Contact
    • Our Party Outline

    As an Amazon Associate we earn from qualifying purchases.

    Copyright ©2022 Foodie Pro on the Foodie Pro Theme